webpack启动流程
当我们执行npm run dev/build的时候,做了什么操作?
"scripts": {
	"build": "wabpack"
}
当使用npm run 的时候,实际上执行的是./node_modules/.bin/webpack 指令。
这个webpack指令是哪儿来的?
是在安装webpack的时候,如果安装的包中有bin选项,那么在安装的时候,如果是全局安装,则会放到全局usr/bin目录下(linux),如果是局部安装,则会放到./node_modules/.bin下。
bin的写法有两种:
// 第一种:在这种情况下,name字段对应的值将作为命令
"bin": "./bin/webpack.js",
// 第二种:可以定义多个命令,每个命令指向不同的可执行文件
"bin": {
  "webpack-cli": "./bin/cli.js"
},所以,对于webpack为例,实际指向的是./bin/webpack.js 文件。
webpack的webpack.js做了什么?
这个脚本是一个Node.js命令行工具的引导程序,用于确保用户安装了必要的webpack命令行工具(CLI),并在需要时自动安装。
具体流程:
- 设置初始退出代码:将
process.exitCode设为0,表示默认情况下程序成功退出。 - 定义
runCommand函数:该函数使用child_process模块运行子进程来执行命令,并返回一个Promise,以便处理异步任务。- 作用:用于执行安装命令或其他命令行任务。
- 定义
isInstalled函数:检查给定的npm包是否已安装。- 作用:用于检测
webpack-cli或webpack-command是否已安装。
- 作用:用于检测
- 定义
CliOption类型:定义了一个包含CLI工具信息的对象结构,用于描述可用的CLI选项。 - 定义可用CLI列表
CLIs:包含两个CLI工具的信息,webpack-cli和webpack-command,并检测它们是否已安装。 - 检查已安装的CLI工具:通过过滤
CLIs列表,获取已安装的CLI工具。- 作用:确定用户系统中已安装的CLI工具数量。
- 如果CLI工具数量为0,处理无已安装CLI工具的情况:
- 显示安装CLI工具的提示信息。
- 检测项目是否使用Yarn作为包管理器。
- 提示用户是否要安装
webpack-cli。 - 根据用户输入,使用
npm或yarn安装webpack-cli。
- 如果CLI工具数量为1,处理已安装一个CLI工具的情况:
- 加载并执行已安装的CLI工具。
- 如果CLI工具数量为2,处理安装了多个CLI工具的情况:
- 提示用户只需安装一个CLI工具,并将退出代码设为1。
最后,如果我们安装了webpack-cli,则会加载并执行webpack-cli,具体的代码为:
require(path.resolve(
	path.dirname(pkgPath),
	pkg.bin[installedClis[0].binName]
));最终实际执行的是./bin/cli.js。
webpack-cli中cli.js做了什么?
1、导入一些不需要编译的参数。比如init,info等
const { NON_COMPILATION_ARGS } = require("./utils/constants");2、如果命令行参数中有上述不需要编译的参数,直接执行prompt-command.js文件并退出
const NON_COMPILATION_CMD = process.argv.find(arg => {
	if (arg === "serve") {
		global.process.argv = global.process.argv.filter(a => a !== "serve");
		process.argv = global.process.argv;
	}
	return NON_COMPILATION_ARGS.find(a => a === arg);
});

if (NON_COMPILATION_CMD) {
	return require("./utils/prompt-command")(NON_COMPILATION_CMD, ...process.argv);
}
prompt-command.js文件做了什么工作?
主要作用是检查特定的 @webpack-cli 包是否已安装,如果未安装,则提示用户是否安装该包。其执行流程如下:
- 构建包的名称和路径,并尝试在本地或全局范围内解析该包的路径。
- 如果包已安装,调用
runWhenInstalled函数继续执行后续逻辑。 - 如果包未安装,构建安装命令(使用
npm或yarn),并通过readline模块向用户提示是否安装该包。 - 根据用户的输入:
- 如果用户同意安装,运行安装命令,然后调用
runWhenInstalled或特定的初始化逻辑。 - 如果用户拒绝安装,显示错误信息并设置退出代码为 1。
- 如果用户同意安装,运行安装命令,然后调用
通过这一流程,函数确保在执行特定命令之前所需的 @webpack-cli 包已经安装。
比如,init示例如下: 
3、引入 yargs,用于解析命令行参数
const yargs = require("yargs").usage(`webpack-cli ${require("../package.json").version}

Usage: webpack-cli [options]
       webpack-cli [options] --entry <entry> --output <output>
       webpack-cli [options] <entries...> --output <output>
       webpack-cli <command> [options]

For more information, see https://webpack.js.org/api/cli/.`);

// 引入 config-yargs.js,用于配置 yargs.配置的内容有很多命令的分组。
require("./config/config-yargs")(yargs);

/**
*解析命令行参数并处理错误、帮助信息等.

   其中,err 为错误信息,argv 为解析后的参数,output 为帮助信息。
   output:
     - 当用户输入有效命令和选项时,output 为空,执行命令逻辑。
     - 当用户请求帮助、版本信息或输入无效命令时,output 包含相应的信息。
*/
yargs.parse(process.argv.slice(2), (err, argv, output) => {
		Error.stackTraceLimit = 30;

		// arguments validation failed
		if (err && output) {
			console.error(output);
			process.exitCode = 1;
			return;
		}

		// help or version info
		if (output) {
			console.log(output);
			return;
		}

		if (argv.verbose) {
			argv["display"] = "verbose";
		}
	...


/*
convert-argv.js文件的作用是解析命令行参数和配置文件,将其转换为 Webpack 可用的配置选项,
并确保所有必要的插件和编译器已正确注册和加载,从而准备好执行 Webpack 构建任务
*/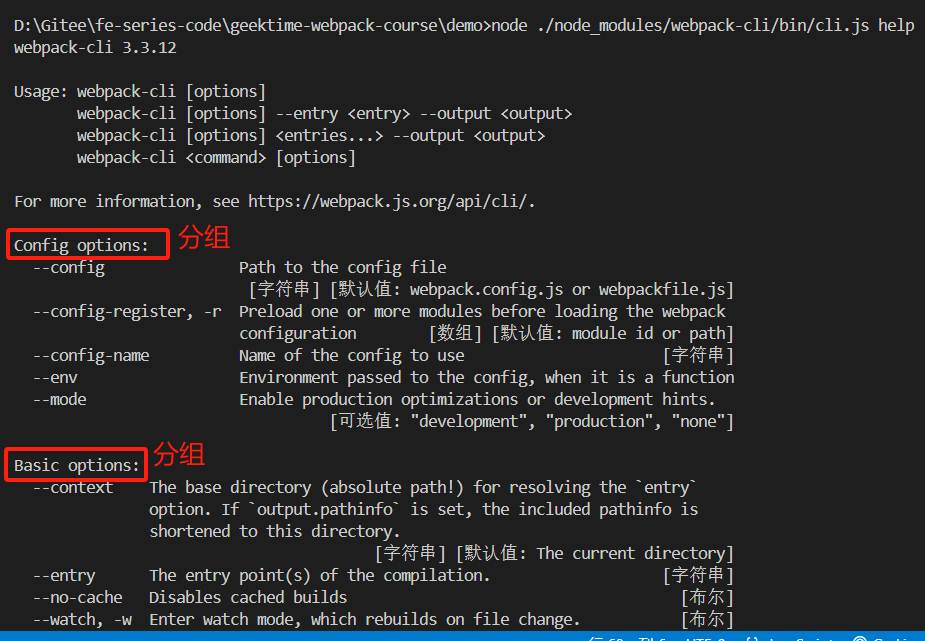
let options = require("./utils/convert-argv")(argv);config-yargs.js配置的分组如下:
参数分组 (config/config-args.js),将命令划分为9类:
- Config options: 配置相关参数(文件名称、运行环境等)
- Basic options: 基础参数(entry设置、debug模式设置、watch监听设置、devtool设置)
- Module options: 模块参数,给 loader 设置扩展
- Output options: 输出参数(输出路径、输出文件名称)
- Advanced options: 高级用法(记录设置、缓存设置、监听频率、bail等)
- Resolving options: 解析参数(alias 和 解析的文件后缀设置)
- Optimizing options: 优化参数
- Stats options: 统计参数
- options: 通用参数(帮助命令、版本信息等)
4、引入webpack,执行编译任务
function processOptions(options) {
 // ...
}
processOptions(options);
processOptions具体的执行内容如下:
- 处理 Promise:如果
options是一个 Promise,则等待其解析后再次调用processOptions,捕获错误并退出。 如果 Webpack 配置文件是以异步方式加载的,比如动态导入或使用某些插件/工具生成的配置,返回值可能是一个 Promise
if (typeof options.then === "function") {
	options.then(processOptions).catch(function(err) {
		console.error(err.stack || err);
		// eslint-disable-next-line no-process-exit
		process.exit(1);
	});
	return;
}- 解析并转换统计选项:根据
options.stats设置输出选项outputOptions,并根据命令行参数进一步调整输出选项。 中间大段 ifArg 的代码主要作用是根据命令行参数对 outputOptions 进行动态配置。 ifArg 是一个辅助函数,用于检查命令行参数是否存在,并根据参数值修改相应的 outputOptions 属性。
outputOptions的作用是配置和控制 Webpack 编译过程中的输出信息。 比如我们一般统计包的大小使用webpack-bundle-analyzer,但是也可以使用stats(webpack --config webpack.prod.js --json > stats.json)进行初略统计,一般不怎么使用。
- 初始化 Webpack 编译器:根据配置选项创建 Webpack 编译器实例,并处理初始化过程中可能的错误。
try {
/**
 * 这段代码是在使用 webpack 函数创建一个新的 webpack 编译器实例。webpack 是一个模块打包工具,它可以将许多模块转换成静态资源。
  在这段代码中,webpack 函数接收一个参数 options,这是一个对象,包含了一系列配置选项。这些选项可以用来定制 webpack 的行为。
  例如,你可以在 options 对象中指定入口文件、输出路径、加载器等。
  webpack(options) 的返回值是一个 webpack 编译器实例,这个实例被赋值给了 compiler 变量。
  你可以使用这个 compiler 实例来启动编译过程,或者对编译过程进行更细粒度的控制。
 */
  compiler = webpack(options);
} catch() {
//...
}- 设置进度插件:如果命令行参数包含
progress,则添加进度插件。
if (argv.progress) {
	const ProgressPlugin = require("webpack").ProgressPlugin;
	new ProgressPlugin({
		profile: argv.profile
	}).apply(compiler);
}- 处理编译回调:定义
compilerCallback处理编译后的输出,包括错误处理和结果输出。
function compilerCallback(err, stats) {
	// 1. 清理缓存
	// 2. 处理错误
	// 3. 输出编译结果
	// 4. 检查错误
}- 执行编译或监视:根据配置选项执行一次性编译或启用文件监视模式。
// 这行代码检查配置选项 `firstOptions` 或 `options` 中是否设置了 `watch` 属性
if (firstOptions.watch || options.watch) {
 // ...
 // 使用 compiler.watch 方法启用 Webpack 的文件监视模式。watchOptions 包含监视相关的选项,compilerCallback 是编译完成后的回调函数。
 compiler.watch(watchOptions, compilerCallback);
} else {
	// 如果没有设置 watch 属性,则执行一次性编译
	compiler.run((err, stats) => {//...})
}最后,总结一下cli.js做的内容:
- 引入 yargs,对命令行进行定制
- 分析命令行参数,对各个参数进行转换,组成编译配置项options
- 引用webpack,根据配置项options进行编译和构建。
compiler到底做了什么?
compiler是引入的webpack库,当使用require引入一个库的时候,实际上调用的是package.json 文件中 main 字段对应的入口文件。
比如 const webpack = require("webpack"); ,实际上找到的lib/webpack.js 文件:
"main": "lib/webpack.js",进入代码后,首先引入了compiler文件:
const Compiler = require("./Compiler");提到compiler文件,就涉及到一个Tapable架构。
Tapable
tapable 是 Webpack 的一个核心库,它提供了钩子机制,用于在不同的生命周期阶段运行插件。tapable 允许开发人员在 Webpack 的编译过程中插入自定义逻辑,从而实现扩展和定制 Webpack 的行为。
tapable 是一个小型的库,提供了多种钩子(hook)类型,用于在特定时刻运行特定的函数。主要的钩子类型包括:
SyncHook:同步执行,不关心返回值。SyncBailHook:同步执行,如果某个钩子返回非undefined,则中断后续钩子的执行。SyncWaterfallHook:同步执行,前一个钩子的返回值会作为参数传给下一个钩子。SyncLoopHook:同步执行,钩子函数返回true时重复执行当前钩子。AsyncParallelHook:并行异步执行,不关心返回值。AsyncParallelBailHook:并行异步执行,如果某个钩子返回非undefined,则中断后续钩子的执行。AsyncSeriesHook:串行异步执行。AsyncSeriesBailHook:串行异步执行,如果某个钩子返回非undefined,则中断后续钩子的执行。AsyncSeriesWaterfallHook:串行异步执行,前一个钩子的返回值会作为参数传给下一个钩子。
可以把tapable理解成nodejs中的EventEmitter,就是一个事件监听器,但是会比EventEmitter的事件监听更复杂点,功能多点。
比如事件的监听和触发,分为同步和异步的方式:
| 同步方式 | 异步方式 | |
|---|---|---|
监听(类似node中的on) | tap | tapAsync/tapPromise |
触发(类似node中的emit) | call | callAsync/promise |
| 示例: |
const { SyncHook, AsyncSeriesHook } = require("tapable");

class MyCompiler {
    constructor() {
        this.hooks = {
            initialize: new SyncHook(),
            compile: new SyncHook(["compilation"]),
            emit: new AsyncSeriesHook(["compilation"])
        };
    }

    run() {
        this.hooks.initialize.call();
        const compilation = {};
        this.hooks.compile.call(compilation);
        this.hooks.emit.callAsync(compilation, (err) => {
            if (err) {
                console.error("Emit phase failed:", err);
            } else {
                console.log("Emit phase succeeded");
            }
        });
    }
}

const compiler = new MyCompiler();

/*
同步绑定
*/
// 注册插件
compiler.hooks.initialize.tap("InitializePlugin", () => {
    console.log("Initialization phase");
});

compiler.hooks.compile.tap("CompilePlugin", (compilation) => {
    console.log("Compilation phase");
    // 模拟生成编译结果
    compilation.result = "some result";
});

/*
异步绑定
*/
compiler.hooks.emit.tapAsync("EmitPlugin", (compilation, callback) => {
    console.log("Emit phase");
    setTimeout(() => {
        console.log("Emitting:", compilation.result);
        callback();
    }, 1000);
});

// 事件触发
compiler.run();
在Webpack 中的实际应用: 在 Webpack 中,tapable 被广泛用于其内部的编译流程,通过钩子机制允许插件在特定阶段执行。以下是一个 Webpack 插件的简单示例:
创建一个 Webpack 插件:
class MyPlugin {
    apply(compiler) {
        // 在编译开始时触发
        compiler.hooks.compile.tap("MyPlugin", (params) => {
            console.log("The compiler is starting to compile...");
        });

        // 在生成资源到 output 目录之前触发
        compiler.hooks.emit.tapAsync("MyPlugin", (compilation, callback) => {
            console.log("The compilation is going to emit files...");
            // 在这里可以访问并修改编译结果
            callback();
        });
    }
}

module.exports = MyPlugin;
在 Webpack 配置文件中使用插件:
const MyPlugin = require("./path/to/MyPlugin");

module.exports = {
    // ...其他配置项
    plugins: [
        new MyPlugin()
    ]
};
tapable相比EventEmitter的优势是什么?
tapable 是专门为解决 Webpack 插件机制中的问题而诞生的。 确实与 Node.js 的 EventEmitter 有一些相似之处,因为两者都允许注册和触发事件,但它们之间有几个重要的区别,使得 tapable 更适合用于 Webpack 的插件系统:
1、钩子类型多样性与灵活性
tapable 提供了多种类型的钩子(同步、异步、串行、并行、瀑布等),每种类型的钩子都有不同的行为和用途,使其在不同场景下更灵活地控制插件的执行顺序和方式。例如:
SyncHook:同步执行,不关心返回值。AsyncSeriesHook:串行异步执行,依次执行每个注册的插件。AsyncParallelHook:并行异步执行,所有插件并发执行。
相比之下,EventEmitter 只支持简单的同步事件机制,没有内置支持复杂的异步控制和执行模式。
2、上下文和数据流管理
tapable 可以传递上下文参数,并通过钩子共享和传递数据。例如,SyncWaterfallHook 会将前一个钩子的返回值传递给下一个钩子,而 EventEmitter 只能传递固定的事件参数,无法动态传递和变更数据。这种能力使得 tapable 更适合处理复杂的编译过程,其中每个阶段可能需要基于前一个阶段的结果进行操作。
3、扩展能力和插件系统需求
tapable 设计为扩展 Webpack 编译过程,支持灵活的插件机制。通过钩子的 tap、tapAsync、tapPromise 等方法,可以方便地处理不同类型的插件和事件。Webpack 的插件系统需要在不同的编译阶段执行特定的逻辑,这些逻辑可能是同步的,也可能是异步的。tapable 提供的钩子类型和控制能力,能够满足 Webpack 插件系统的复杂需求。
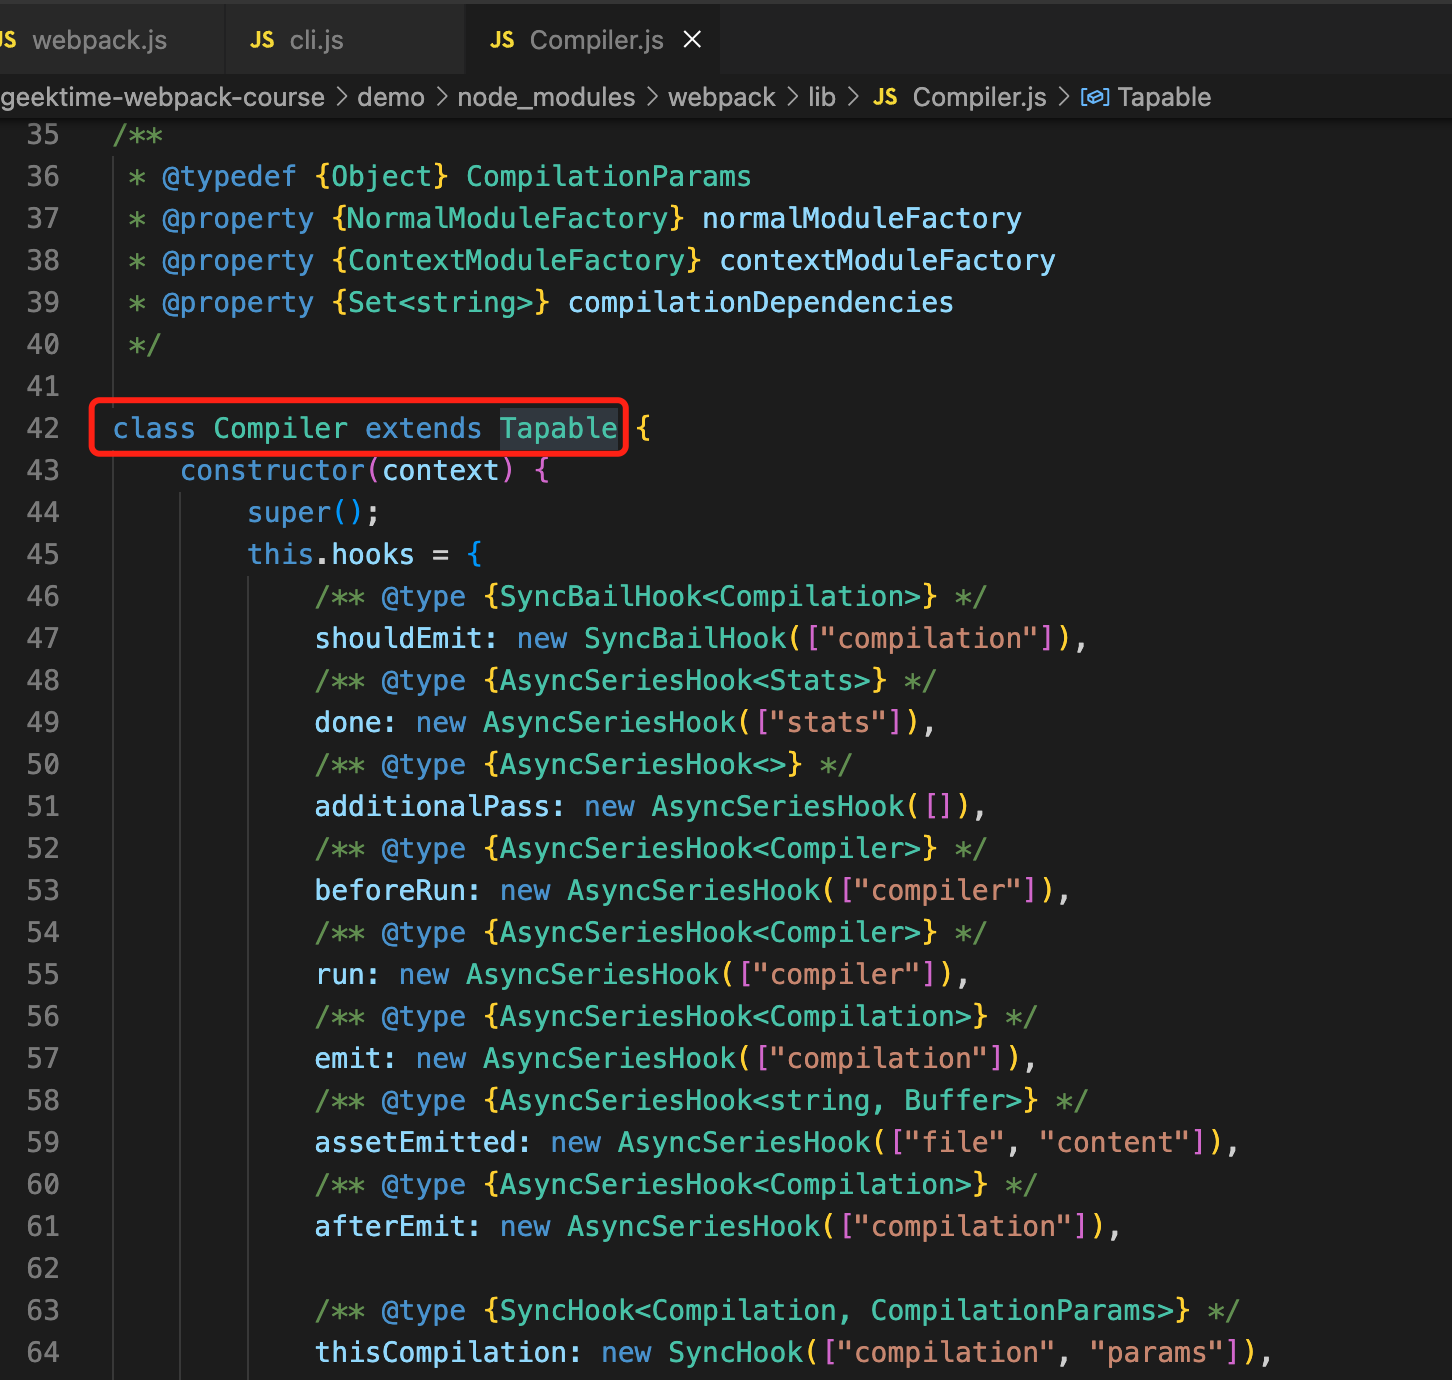
compiler对象
compiler对象其实就是继承tapable的,然后定义了很多个hooks。
还有一个
compilation.js,负责模块编译,打包,优化的过程。
然后所有的插件都有个apply方法,参数传入compiler对象。
在apply里面监听compiler的某些hook,然后当compiler对象去触发这些hook的时候,就在插件中捕获到该事件,执行一些逻辑。这就是插件的执行逻辑。
总结一下:插件就是监听compiler中上百个hook的其中几个,然后执行一些特定的操作。
演示代码:
// compiler.js
const {
    SyncHook,
    AsyncSeriesHook
} = require('tapable');

module.exports = class Compiler {
    constructor() {
        this.hooks = {
            accelerate: new SyncHook(['newspeed']),
            brake: new SyncHook(),
            calculateRoutes: new AsyncSeriesHook(["source", "target", "routesList"])
        }
    }
    run(){
        this.accelerate(10)
        this.break()
        this.calculateRoutes('Async', 'hook', 'demo')
    }
    accelerate(speed) {
        this.hooks.accelerate.call(speed);
    }
    break() {
        this.hooks.brake.call();
    }
    calculateRoutes() {
        this.hooks.calculateRoutes.promise(...arguments).then(() => {
        }, err => {
            console.error(err);
        });
    }
}
自定义插件: ^5480f4
const Compiler = require('./Compiler')

class MyPlugin{
    constructor() {

    }
    apply(compiler){
        compiler.hooks.brake.tap("WarningLampPlugin", () => console.log('WarningLampPlugin'));
        compiler.hooks.accelerate.tap("LoggerPlugin", newSpeed => console.log(`Accelerating to ${newSpeed}`));
        compiler.hooks.calculateRoutes.tapPromise("calculateRoutes tapAsync", (source, target, routesList) => {
            return new Promise((resolve,reject)=>{
                setTimeout(()=>{
                    console.log(`tapPromise to ${source} ${target} ${routesList}`)
                    resolve();
                },1000)
            });
        });
    }
}

const myPlugin = new MyPlugin();

const options = {
    plugins: [myPlugin]
}

const compiler = new Compiler();

for (const plugin of options.plugins) {
    if (typeof plugin === "function") {
        plugin.call(compiler, compiler);
    } else {
        plugin.apply(compiler);
    }
}
compiler.run();当最后compiler.run();的时候,插件就会触发对应的hook,执行特定的逻辑。
webpack如何使用tapable的?
上面我们提到,实际执行的是lib/webpack.js,我们看了源码,其实和上面的示例过程是相同的。
const webpack = (options, callback) => {
const webpackOptionsValidationErrors = validateSchema(
webpackOptionsSchema,
options
);
if (webpackOptionsValidationErrors.length) {
throw new WebpackOptionsValidationError(webpackOptionsValidationErrors);
}
let compiler;
if (Array.isArray(options)) {
compiler = new MultiCompiler(
Array.from(options).map(options => webpack(options))
);
} else if (typeof options === "object") {
/**
* 引入webpack.config.js中的配置
*/
options = new WebpackOptionsDefaulter().process(options);
/**
* 构建Compiler
*/
compiler = new Compiler(options.context);
compiler.options = options;
new NodeEnvironmentPlugin({
infrastructureLogging: options.infrastructureLogging
}).apply(compiler);
/**
* 如果插件配置存在,那么遍历这些插件,然后apply(compiler),
* 监听compiler的一些hook
*/
if (options.plugins && Array.isArray(options.plugins)) {
for (const plugin of options.plugins) {
if (typeof plugin === "function") {
plugin.call(compiler, compiler);
} else {
plugin.apply(compiler);
}
}
}
compiler.hooks.environment.call();
compiler.hooks.afterEnvironment.call();
/**
* 导入webpack自身内置的一些插件
*/
compiler.options = new WebpackOptionsApply().process(options, compiler);
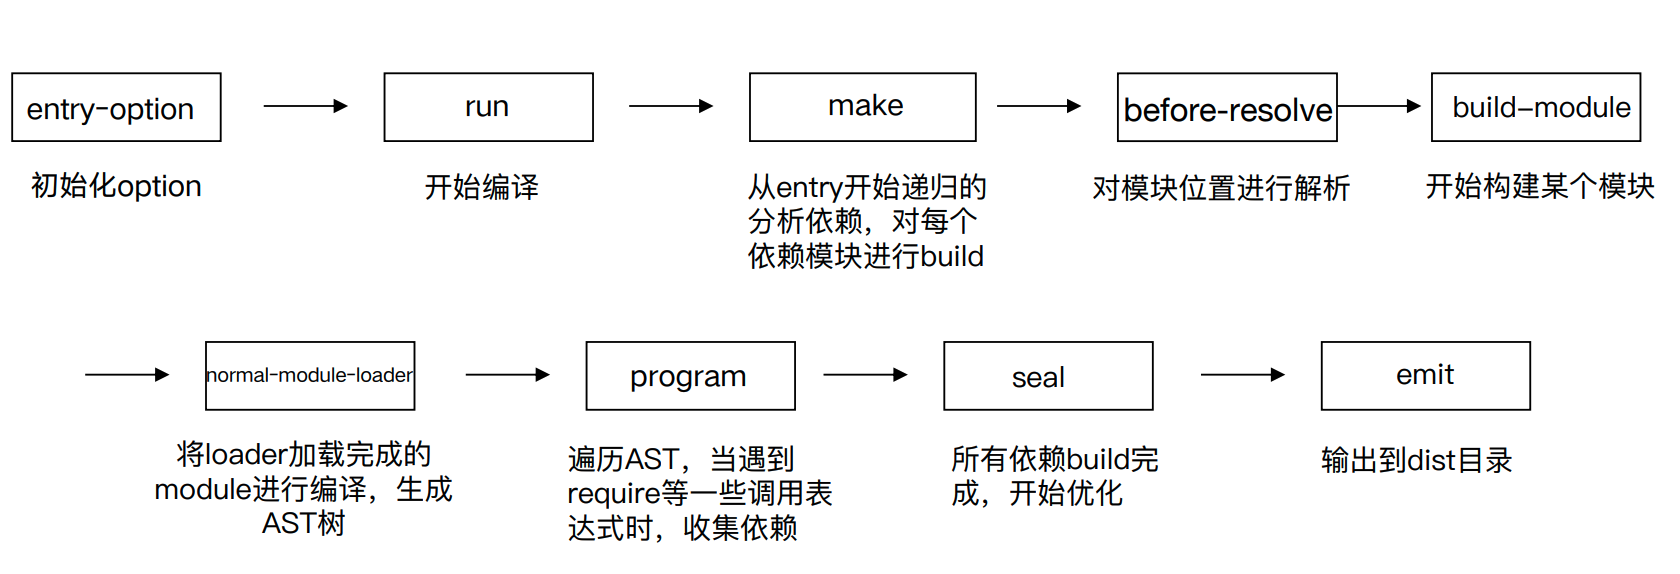
}webpack编译过程
webpack的编译都按照下面的钩子调用顺序执行:
1、准备阶段
回到lib/webpack.js里面,会先触发entryOption事件:
/**
* 根据一些配置,导入webpack自身内置的一些插件
* 比如开启devtool会导入EvalDevtoolModulePlugin, SourceMapDevToolPlugin等插件
*/
compiler.options = new WebpackOptionsApply().process(options, compiler);在WebpackOptionsApply.js源代码中有一行,compiler会触发entryOption事件:
new EntryOptionPlugin().apply(compiler);
compiler.hooks.entryOption.call(options.context, options.entry);
监听的位置如下: 
然后执行compiler.run的时候,先触发beforeRun然后触发run,最后执行compile,第二阶段模块编译。
// compiler.js
this.hooks.beforeRun.callAsync(this, err => {
	if (err) return finalCallback(err);

	this.hooks.run.callAsync(this, err => {
		if (err) return finalCallback(err);

		this.readRecords(err => {
			if (err) return finalCallback(err);

			this.compile(onCompiled);
		});
	});
});
2、模块构建优化阶段
在compile阶段,流程相关hook:
- beforeRun/run
- beforeCompile/compile/afterCompile
- make
- emit/afterEmit
- done
如果是watch,则是下面的流程:
- watch-run
- watch-close
compile会调用compilation文件,里面也有hook:
- addEntry
- finish(上报模块错误)
- seal(资源生成,优化)
compile(callback) {
	/**
	 * 创建两个工厂函数
	 * NormalModuleFactory:处理普通导出的模块
	 * ContextModuleFactory:处理require导入的模块
	 */
	const params = this.newCompilationParams();
	this.hooks.beforeCompile.callAsync(params, err => {
		if (err) return callback(err);

		this.hooks.compile.call(params);

		const compilation = this.newCompilation(params);

		this.hooks.make.callAsync(compilation, err => {
			if (err) return callback(err);

			compilation.finish(err => {
				if (err) return callback(err);

				compilation.seal(err => {
					if (err) return callback(err);

					this.hooks.afterCompile.callAsync(compilation, err => {
						if (err) return callback(err);

						return callback(null, compilation);
					});
				});
			});
		});
	});
}
其实还有很多类型的ModuleFactory: 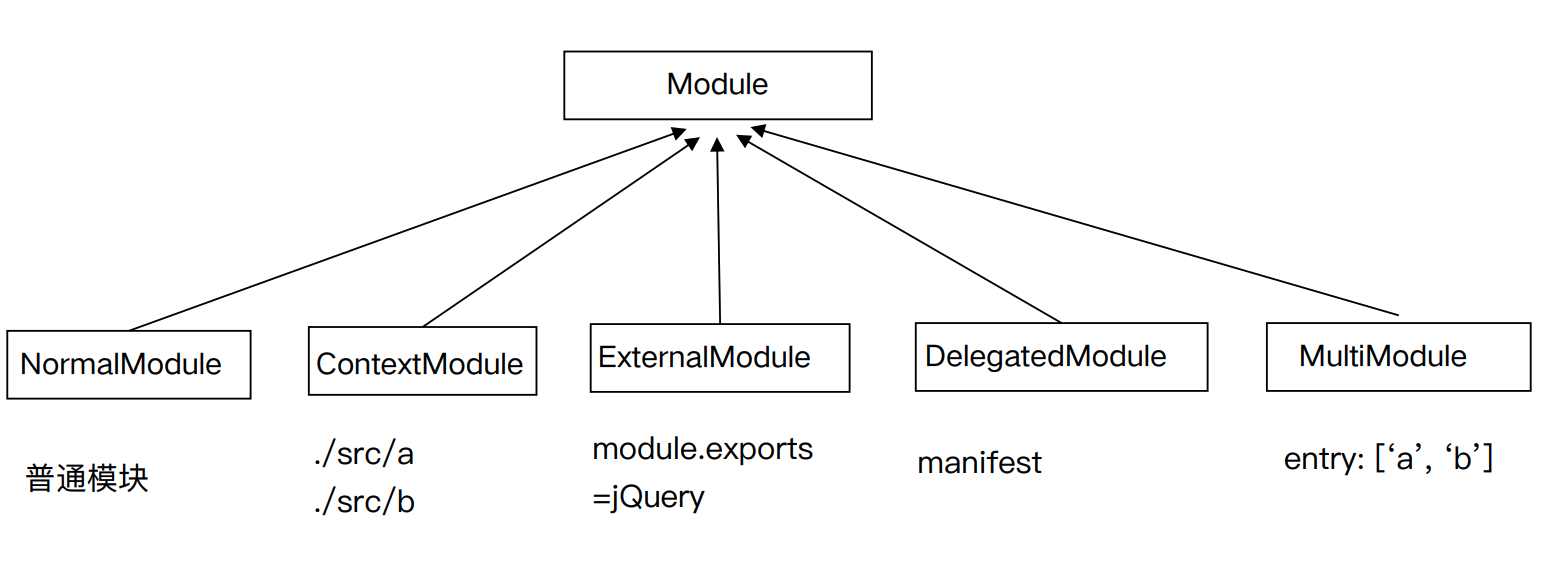
这里以普通模块为例,看看make做了啥?
整个流程:
- 使用 loader-runner 运行 loaders来构建代码
- 在构建代码的中,如果有通过require引入了依赖,则通过 Parser 解析 (内部是 acron),将解析的依赖通过ParserPlugins 添加到依赖列表。
 在SingleEntryPlugin中,当compilation加入后,就会正式开始编译:
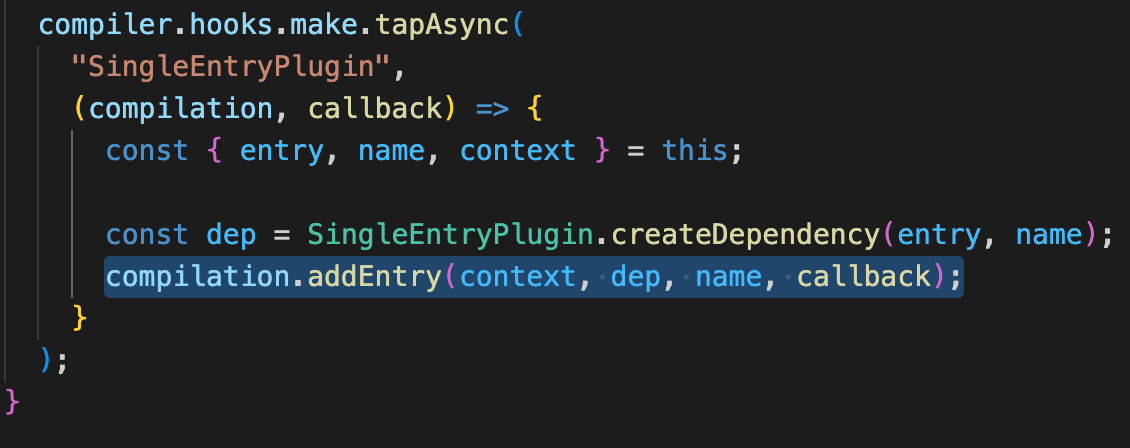
compilation首先会触发buildModule,buildModule会调用普通模块NormalModule中的build方法,build方法会调用doBuild方法,doBuild具体要做的事情就是,使用loader-runner,使用loader构建代码。
doBuild(options, compilation, resolver, fs, callback) {
	const loaderContext = this.createLoaderContext(
		resolver,
		options,
		compilation,
		fs
	);

	runLoaders(
		{
			resource: this.resource,
			loaders: this.loaders,
			context: loaderContext,
			readResource: fs.readFile.bind(fs)
		},
		(err, result) => {
			// ...
}doBuild完成后,会调用parser.parse 也就是acorn,用来提取我们代码中通过require导入的依赖,然后添加到依赖列表中,然后遍历依赖的模块继续进行构建。
//...
return this.doBuild(options, compilation, resolver, fs, err => {
	//...
	try {
		const result = this.parser.parse(
			this._ast || this._source.source(),
			{
				current: this,
				module: this,
				compilation: compilation,
				options: options
			},
			(err, result) => {
				if (err) {
					handleParseError(err);
				} else {
					handleParseResult(result);
				}
			}
		);
模块构建好了会触发succeedModule钩子,然后整个make阶段就结束了。
然后生成的资源进入seal阶段,做一些优化工作。
在make的时候,chunk的生成算法:
- webpack 先将 entry 中对应的 module 都生成一个新的 chunk
- 遍历 module 的依赖列表,将依赖的 module 也加入到 chunk 中
- 如果一个依赖 module 是动态引入的模块,那么就会根据这个 module 创建一个 新的 chunk,继续遍历依赖
- 重复上面的过程,直至得到所有的 chunk
3、代码生成到dist
构建优化完成,在onCompiled回调里面会调用emitAssets函数:
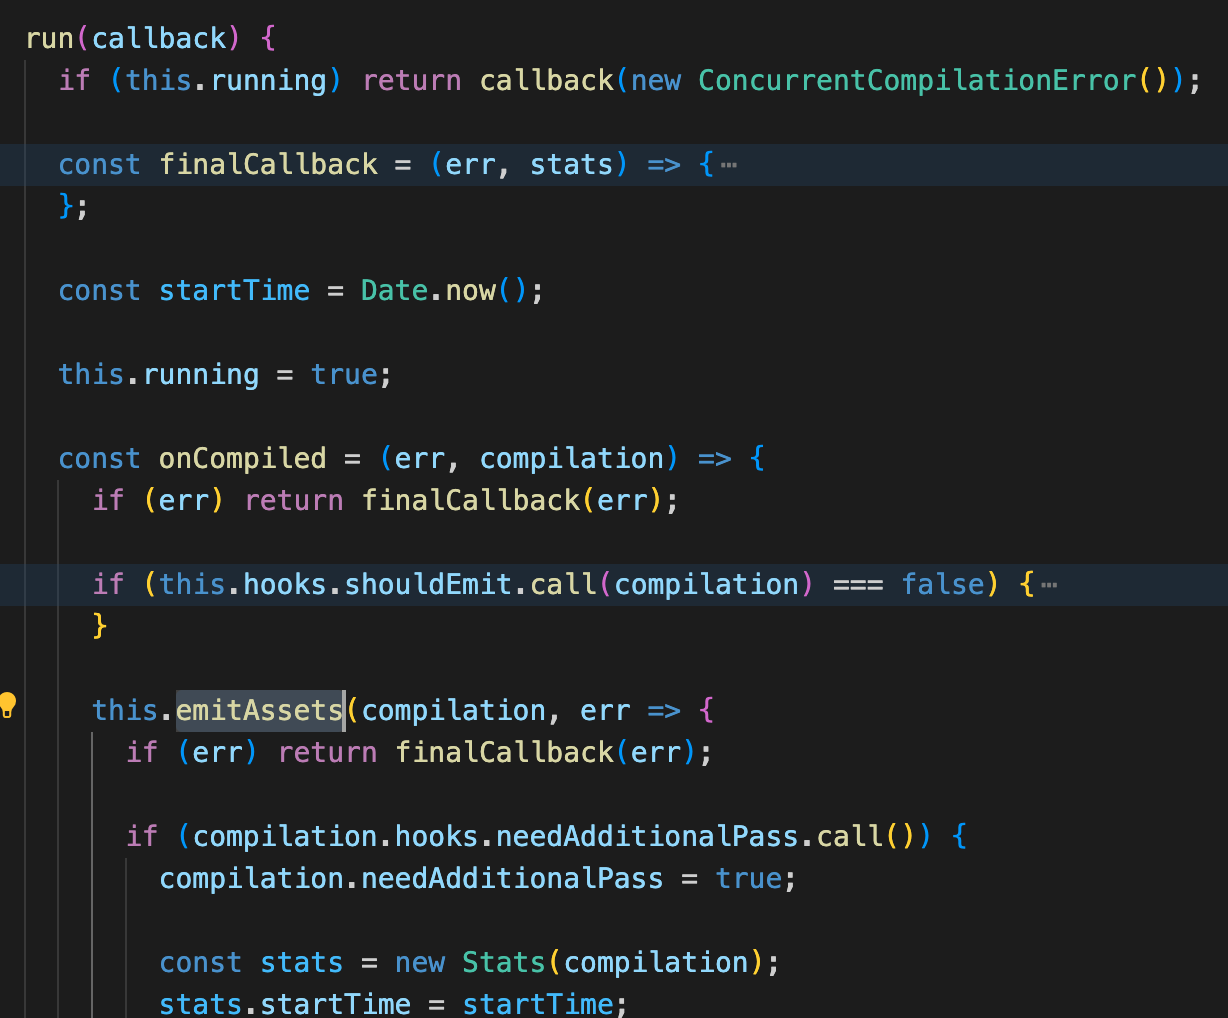
这个方法最后触发emit事件,然后通过outputFileSystem输出到dist目录。
emitAssets(compilation, callback) {
	let outputPath;

	const emitFiles = err => {
		//...
	}
	this.hooks.emit.callAsync(compilation, err => {
		if (err) return callback(err);
		outputPath = compilation.getPath(this.outputPath);
		this.outputFileSystem.mkdirp(outputPath, emitFiles);
	});
}
自己实现一个简易webpack:simplepack
功能:
- 转化es6到es5:通过 babylon 生成AST,然后通过 babel-core 将AST重新生成源码
- 分析模块之间的依赖关系:通过 babel-traverse 的 ImportDeclaration 方法获取依赖属性
- 生成类似webpack的模块结构
项目结构如下: 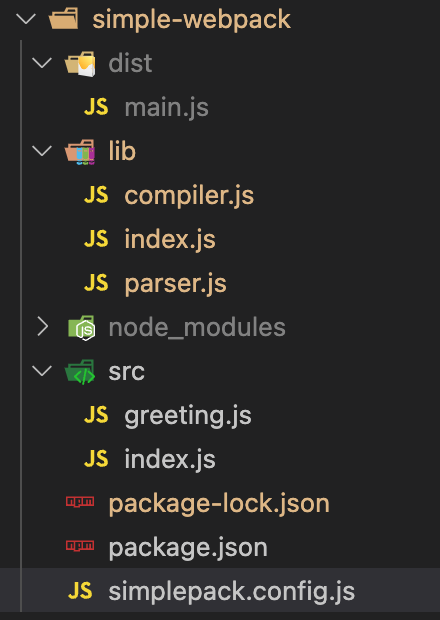
parser.js文件,用来转化es6到es5,并且分析模块之间的依赖关系:
// parser.js


const fs = require('fs');
const babylon = require('babylon');
const traverse = require('babel-traverse').default;
const { transformFromAst } = require('babel-core');

module.exports = {
    /**
     * 生成ast语法树
     * @param {*} path
     * @returns
     */
    getAST: (path) => {
        const content = fs.readFileSync(path, 'utf-8')

        return babylon.parse(content, {
            sourceType: 'module',
        });
    },
    /**
     * 分析生成的依赖
     * 示例:类似 [./greeting.js]
     * @param {*} ast
     * @returns
     */
    getDependencis: (ast) => {
        const dependencies = []
        traverse(ast, {
          ImportDeclaration: ({ node }) => {
            dependencies.push(node.source.value);
          }
        });
        return dependencies;
    },
    /**
     * 讲ast生成es5代码
     * @param {*} ast
     * @returns
     */
    transform: (ast) => {
        const { code } = transformFromAst(ast, null, {
            presets: ['env']
        });

        return code;
    }
};
compiler.js用来生成类似webpack的模块结构,并写入到本地文件:
// compiler.js

const fs = require('fs');
const path = require('path');
const { getAST, getDependencis, transform } = require('./parser');


module.exports = class Compiler {
    constructor(options) {
        const { entry, output } = options;
        this.entry = entry;
        this.output = output;
        this.modules = []; // 存放依赖列表
    }

    run() {
        const entryModule = this.buildModule(this.entry, true);
        // 构建好的模块添加到modules
        this.modules.push(entryModule);
        // 如果有依赖,则循环依赖进行构建,然后也添加到modules
        this.modules.map((_module) => {
            _module.dependencies.map((dependency) => {
                this.modules.push(this.buildModule(dependency));
            });
        });
        this.emitFiles();
    }
    /**
     * 构建单个模块
     * @param {*} filename
     * @param {*} isEntry
     * @returns
     */
    buildModule(filename, isEntry) {
        let ast;
        if (isEntry) {
            ast = getAST(filename);
        } else {
            let absolutePath = path.join(process.cwd(), './src', filename);
            ast = getAST(absolutePath);
        }

        return {
          filename,
          dependencies: getDependencis(ast),
          transformCode: transform(ast)
        };
    }
    /**
     * 输出代码到dist
     */
    emitFiles() {
        const outputPath = path.join(this.output.path, this.output.filename);
        let modules = '';
        this.modules.map((_module) => {
            modules += `'${ _module.filename }': function (require, module, exports) { ${ _module.transformCode } },`
        });
        /**
         * 构建类似webpack 的模块结构
         */
        const bundle = `
            (function(modules) {
                function require(fileName) {
                    const fn = modules[fileName];

                    const module = { exports : {} };

                    fn(require, module, module.exports);

                    return module.exports;
                }

                require('${this.entry}');
            })({${modules}})
        `;
        // 写入到simplepack.config.js中指定的dist/main.js中
        fs.writeFileSync(outputPath, bundle, 'utf-8');
    }
};
index.js执行的入口文件:
// index.js
const Compiler = require('./compiler.js');
const options = require('../simplepack.config.js');
/**
 * 通过compiler.run来执行构建
 */
new Compiler(options).run();
simplepack.config.js
'use strict';

const path = require('path');

module.exports = {
    entry: path.join(__dirname, './src/index.js'),
    output: {
        path: path.join(__dirname, './dist'),
        filename: 'main.js'
    }
};